VirtualBox Host Interface Networking with NAT
Posted by admin on September 21, 2008 under Tech Tips | ![]() Be the First to Comment
Be the First to Comment
WARNING! THIS POST HAS BEEN MARKED AS OUTDATED!
While there may be useful information still contained within the article, there may be other more relevant articles out on the Internet. Please pay close attention to version numbers of software that this article refers to. If you’re not careful, you could break your system if you do not understand what you are doing. If you would like to see this article updated, please contact the site administrator using the Contact page. Thanks!
UPDATE (12/13/2009):The latest versions of VirtualBox 3 have made great improvements in their guest networking options. It is now possible to natively bridge and NAT multiple guests behind a single virtual interface. The suggestions on this post still work fairly well, so I will leave it up as there is a great deal of useful information that come in handy in some scenarios. Please refer to the latest VirtualBox documentation for more help on using their native networking options.
ORIGINAL: Here’s a detailed tutorial on VirtualBox host interface networking with NAT for multiple guests. I typically run a number of guests simultaneously for labs and product testing, so they all need internet access through my host, as well as full communication directly with each other.
The built in NAT interface of VirtualBox isn’t very flexible for what we want to do, so here’s a summary what what we will do. We’ll create three TAP interfaces, one for each guest, since TAP interfaces cannot be shared by multiple guests. These interfaces will serve as each guest’s default gateway, but all of the guests will use the same address space and subnet mask. For full communication between the guests, we’ll add appropriate host routes and enable proxy ARP on the host. Nothing will need to be configured on the guests accept for their IP address, subnet mask, default gateway, and DNS if needed.
Here’s a diagram of the virtual topology, which hopefully will make things a little more clear.
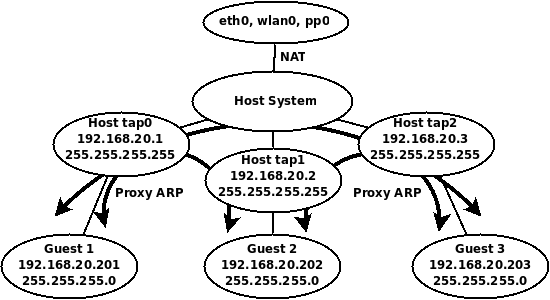
VirtualBox Host Interface NAT Topology
Getting Started
You’ll need to install the User Mode Linux utilities first, if you have done so already.
sudo apt-get install uml-utilities
TAP interfaces
Let’s create three TAP interfaces.
sudo tunctl -u $USER
sudo tunctl -u $USER
sudo tunctl -u $USER
Assign IP addresses to the TAP interfaces.
sudo ip addr add 192.168.20.1/32 dev tap0
sudo ip addr add 192.168.20.2/32 dev tap1
sudo ip addr add 192.168.20.3/32 dev tap2
sudo ip link set tap0 up
sudo ip link set tap1 up
sudo ip link set tap2 up
Routing Requirements
Enable routing and add host routes for each of the guest IP addresses.
sudo sysctl net.ipv4.ip_forward=1
sudo route add -host 192.168.20.201 dev tap0
sudo route add -host 192.168.20.202 dev tap1
sudo route add -host 192.168.20.203 dev tap2
Proxy ARP
Enable proxy ARP on all TAP interfaces so that all the guests can communicate with each other.
sudo sysctl net.ipv4.conf.tap0.proxy_arp=1
sudo sysctl net.ipv4.conf.tap1.proxy_arp=1
sudo sysctl net.ipv4.conf.tap2.proxy_arp=1
Notice, it is NOT necessary to enable proxy ARP on the public interface, since we will be using NAT for guests to access the public network and internet.
NAT Configuration
First flush all iptables rules and enable NAT on the public interface.
sudo iptables --flush
sudo iptables -t nat --flush
sudo iptables -t nat -A POSTROUTING --out-interface eth0 -j MASQUERADE
sudo iptables -A FORWARD --in-interface tap0 -j ACCEPT
sudo iptables -A FORWARD --in-interface tap1 -j ACCEPT
sudo iptables -A FORWARD --in-interface tap2 -j ACCEPT
Now it’s just a matter of configuring each of your guests to use the appropriate host interface as shown in the screenshot below.

Guest 1
Host interface: tap0
IP Address: 192.168.20.201
Subnet Mask: 255.255.255.0
Gateway: 192.168.20.1
DNS: Any reachable DNS server.

Guest 2
Host interface: tap1
IP Address: 192.168.20.202
Subnet Mask: 255.255.255.0
Gateway: 192.168.20.2
DNS: Any reachable DNS server.

Guest 3
Host interface: tap2
IP Address: 192.168.20.203

Subnet Mask: 255.255.255.0
Gateway: 192.168.20.3
DNS: Any reachable DNS server.
And that’s it. Your guests should all be able to ping each other, and access the internet!
To make things easy, I have also created the following Bash shell script that creates and tears down the environment with ease. Modify settings to your liking.
#!/bin/bash
# tap-setup.sh
# By Gilbert Mendoza

# Change username accordingly
USER="gmendoza"
PROXY="tap0 tap1 tap2"
TAPS="tap0 tap1 tap2"
NAT_OUT="eth0 wlan0"

ip_setup(){
ip addr add 192.168.20.1/32 dev tap0
ip addr add 192.168.20.2/32 dev tap1
ip addr add 192.168.20.3/32 dev tap2
route add -host 192.168.20.201 dev tap0
route add -host 192.168.20.202 dev tap1
route add -host 192.168.20.203 dev tap2
}

nat_setup(){
iptables --flush
iptables -t nat --flush
for i in $NAT_OUT
 do
   iptables -t nat -A POSTROUTING --out-interface $i -j MASQUERADE
done
for i in $TAPS
 do
   iptables -A FORWARD --in-interface $i -j ACCEPT
done
}

tap_up(){
tunctl -u $USER
tunctl -u $USER
tunctl -u $USER
sysctl net.ipv4.ip_forward=1
for i in $PROXY
 do
   sysctl net.ipv4.conf.$i.proxy_arp=1
done
for i in $TAPS
 do
   ip link set $i up
done
}

tap_down(){
sysctl net.ipv4.ip_forward=0
iptables --flush
iptables -t nat --flush
for i in $PROXY
 do
   sysctl net.ipv4.conf.$i.proxy_arp=0
done
for i in $TAPS
 do
   tunctl -d $i
done
}

if [[ $EUID -ne 0 ]]; then
  echo "This script must be run as root" 1>&2
  exit 1
else

case "$1" in

start)
	tap_up
	ip_setup
	nat_setup
	;;
stop)
	tap_down
	;;
*)
	echo "Usage: $0 {start|stop}"
	;;
esac

fi

exit 0
|
Using it is as simple as the following.
sudo tap-setup.sh start
sudo tap-setup.sh stop

Add A Comment