Posted by admin on December 9, 2009 under Tech Tips | 
If you’re running the Gnome desktop environment and would like to have GnuPG context menu options in Nautilus to encrypt, decrypt, and digitally sign files, simply install the Seahorse plugins package available in your favorite Linux distribution repositories. If using Debian or Ubuntu, it’s as easy as an apt-get install.
sudo apt-get install seahorse-plugins
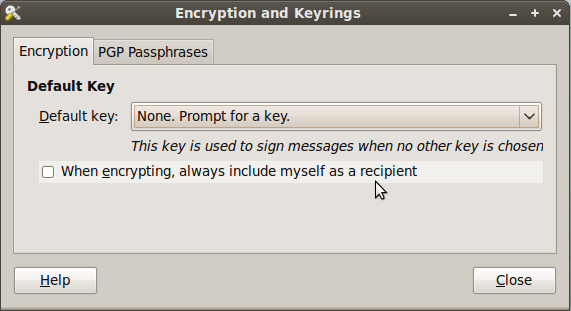
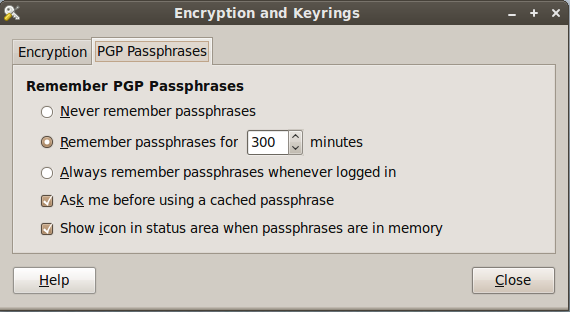
After installing the package, go to System -> Preferences -> Encryption and Keyrings, select a default key to use and decide whether you want to include your own key by default when encrypting files. This is sometimes a good idea if you ever want to open a file you encrypted to someone else. Below are some screenshots of the Seahorse preferences.
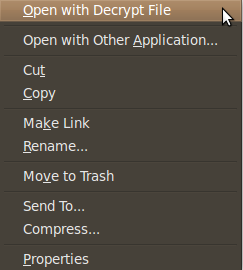
Here are some screen shots of the context menu options that appear when you right click on files in Nautilus.
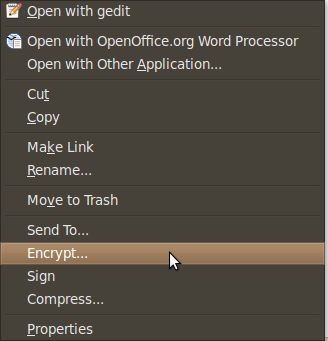
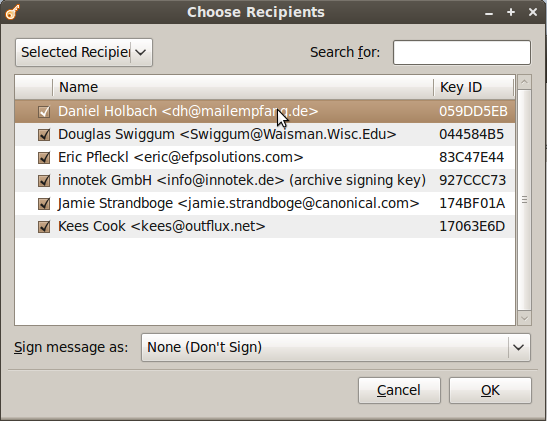
When you choose to encrypt a file, you can select as many public keys as you’d like. Here’s an example of the dialogue.
Using PGP has never been easier. There are still some improvements to the UI I would like to see completed, but overall the most important features are there.
Posted by admin on June 21, 2009 under Tech Tips |
I recently needed to organize a large number of old digital photos that had the wrong date embedded in their EXIF tag data. The camera I used many years ago would often lose track of time and would sometimes be set to the wrong year. Applications I now use to organize photos read this data and made my albums difficult to navigate. I came across a Linux command line utility called jhead that allows you to modify this information to whatever you wish, and its easy to use in scripts as well. Installing was easy, because it’s currently in most repositories, including Ubuntu’s.
To read existing EXIF tag data, simply run jhead against an image without any options. As you can see from the example below, my date is set to the year 2022.
jhead image.jpg

File name : image.jpg

File size : 159390 bytes

File date : 2004:01:12 07:35:23

Camera make : Samsung

Camera model : Digimax 200

Date/Time : 2022:02:12 04:04:17

Resolution : 800 x 600

Flash used : Yes

Exposure time: 0.045 s (1/22)

Aperture : f/2.8
To clear all EXIF data from the file, use the -de option. Then recreate the EXIF fields with the -mkexif option, and check the data again. Notice the new Date/Time is set to the timestamp on the file.
jhead -de image.jpg

Modified: image.jpg
jhead -mkexif image.jpg

Modified: image.jpg
jhead image.jpg

File name : image.jpg

File size : 147751 bytes

File date : 2004:01:12 07:35:23

Date/Time : 2004:01:12 07:35:23

Resolution : 800 x 600
To change the entire timestamp manually, use the -ts option. Notice, there is no space between the -ts and the option. I could not trust the month and day, so I simply chaged the date to midnight on January 1, 2003.
jhead -ts2003:01:01-00:00:00 image.jpg

Modified: image.jpg
jhead image.jpg

File name : image.jpg

File size : 147751 bytes

File date : 2004:01:12 07:35:23

Date/Time : 2003:01:01 00:00:00

Resolution : 800 x 600
For many more options, check out the man page or visit the jhead site for more info.
Posted by admin on October 19, 2008 under Tech Tips |
Here’s a simple tutorial on how to backup a list of all your installed repository applications, and restore them to another machine, perhaps even the same machine after a clean installation. This can save you an incredible amount of time, especially when this task must be repeated often. Of course, being that Ubuntu is based on Debian, this will work for any Debian based platform.
First, from a computer with all the applications preinstalled, retrieve your installed package list and redirect the output to a file called packages.txt. Save this package list somewhere so that you can use it for the restore process.
sudo dpkg --get-selections > packages.txt
To restore all the applications from your list, you must follow a three step process very carefully.
sudo dpkg --clear-selections
sudo dpkg --set-selections < packages.txt
sudo aptitude install
You will be prompted to install all the new applications in the list.
Another example of what this process allows you to do is create a baseline of all the applications after a clean installation of Ubuntu. Let’s say you would like to remove any applications installed since the clean install, perform the exact same process, and any package not defined in that list will be removed.
sudo dpkg --get-selections > clean-install-package-list.txt
sudo dpkg --clear-selections
sudo dpkg --set-selections < clean-install-package-list.txt
sudo aptitude install
The very first command of “–clear-selections” marks all currently installed packages to the state “deinstall”. When you restore the list of applications using “–set-selections”, only packages ommited from the list will remain in the “deinstall” state. Aptitude will honor the deinstall state and remove the extra packages, leaving you only with packages from the list. Most excellent. 
Posted by admin on September 20, 2008 under Tech Tips |
Introduced first in Ubuntu 8.04, UFW is Ubuntu’s “uncomplicated firewall”, a remarkably easy to use tool for creating simple iptables firewall rules. The goal behind UFW is to make it easy for administrators and even third party packages to work with firewall rules in a clean and consistent manner. When UFW is enabled, the default set of rules work very well for the average server or desktop platform, as it blocks all non-essential inbound network access without hobbling certain types of useful protocols and return traffic.
In the following example, we will set up a very simple firewall adequate for almost anyone.
First, let’s check the status of UFW, and the currently installed iptables rule set. The following displays that UFW is disabled and that there are no rules for iptables INPUT chain.
Check firewall status
sudo ufw status
Firewall not loaded

sudo iptables -L INPUT -n | column -t
Chain             INPUT  (policy  DROP)
target            prot   opt      source     destination
Enable UFW
Now, let’s enable UFW and examine the change to iptables’ INPUT chain.
sudo ufw enable
Firewall started and enabled on system startup

sudo iptables -L INPUT -n | column -t
Chain             INPUT  (policy  DROP)
target            prot   opt      source     destination
ufw-before-input  all    --       0.0.0.0/0  0.0.0.0/0
ufw-after-input   all    --       0.0.0.0/0  0.0.0.0/0
The default policy was changed to drop all traffic, and two new chains are referenced. For a much better understanding of what the default rules are, take a look at the files “/etc/ufw/before.rules” and “/etc/ufw/after.rules“.
Connection Tracking
For your convenience, UFW also enables some very useful connection tracking rules, which intelligently inspect outbound application traffic and dynamically allows the return traffic for you. By default, TCP, UDP, FTP and IRC connection tracking modules are loaded, but others may be added to the IPT_MODULES variable in the file “/etc/default/ufw“.
For example, I sometimes need to use TFTP for sending and receiving firmware to and from routers. So I typically add “nf_conntrack_tftp” to the variable IPT_MODULES.
IPT_MODULES="nf_conntrack_ftp nf_nat_ftp nf_conntrack_irc nf_nat_irc nf_conntrack_tftp"
Remember to reload UFW so that the conntrack module is loaded.
sudo /etc/init.d/ufw restart
Allowing inbound services
If your system runs server applications such as DNS, SSH, TFTP and web, then you can add them to your firewall rules using these very simple commands. If you don’t run servers on your machine, this step can be skipped.
sudo ufw allow 53
sudo ufw allow 22/tcp
sudo ufw allow 69/udp
sudo ufw allow 80/tcp
Notice that the first command I used did not specify UDP or TCP. When omitted, UFW adds both protocols. DNS uses TCP for larger DNS exchanges like zone transfers and huge replies, so you’ll probably want both.
UFW displays the results very nicely.
sudo ufw status
Firewall loaded


To                         Action  From
--                         ------  ----
53:tcp                     ALLOW   Anywhere
53:udp                     ALLOW   Anywhere
22:tcp                     ALLOW   Anywhere
69:udp                     ALLOW   Anywhere
80:tcp                     ALLOW   Anywhere
SYN cookies and more
UFW can be used to load kernel options, too. These are defined in “/etc/ufw/sysctl.conf“. For example, I wanted to enable SYN cookies which was added to thwart certain TCP DoS attacks. Modify the following line to 1 in order to enable the feature.
net/ipv4/tcp_syncookies=1
Logging can suck
Okay, if you’re on a busy network and don’t want to fill up your syslog, you might want to disable UFW’s logging.
sudo ufw logging off
And really that’s all there is to it. Be sure to check out the man page for some more examples and features you may be interested in.
Posted by admin on August 9, 2008 under Tech Tips |
As described by the author, Word War Vi is “a retro styled side scrolling shoot’em up arcade game for linux”. The game play is fast paced, complemented by superb audio and very addictive.


At the time of this writing, there was no Ubuntu/Debian package, but compiling the game is a snap.
To get the latest version, please visit the Word War Vi site and download the source code.
Install Prerequisites and Dependencies
sudo apt-get install build-essential gnome-core-devel portaudio19-dev libvorbis-dev
Extract, Compile and Install
Replace x.xx in the file name with the current version number of the file downloaded. It shouldn’t need to be mentioned, but just in case. 
tar zxfv wordwarvi-x.xx.tar.gz

cd wordwarvi*

make && sudo make install
Execute and Have fun
wordwarvi
I noticed when running the game, my audio sounded a bit garbled. Changing the Sound Device seemed to clear it up, although the number varied depending on the sound card of each of the machines I’ve tested it on. Try incrementing the number until one sounds normal.
wordwarvi --sounddevice 0

wordwarvi --sounddevice 1

wordwarvi --sounddevice 2
Posted by admin on December 25, 2007 under Tech Tips |
The Linux console framebuffer allows you to achieve higher screen resolutions within your Linux console. However, as of this writing, Ubuntu 7.10 Gutsy by default does not load the required kernel modules. By passing the “vga=XXX” kernel option without these modules loaded, you are left with a blinking cursor in the upper-left hand corner of your screen. Here’s how to get the console framebuffer in working order.
1. Ensure the initrd image includes framebuffer support by adding “fbcon” and “vesafb” to /etc/initramfs-tools/modules.
$ echo "vesafb" | sudo tee -a /etc/initramfs-tools/modules
$ echo "fbcon" | sudo tee -a /etc/initramfs-tools/modules
2. Remove (or comment out) “vesafb” from blacklisted modules in /etc/modprobe.d/blacklist-framebuffer.
#blacklist vesafb
3. Add the desired framebuffer variable to the default kernel options section in /boot/grub/menu.lst. For 1024×768, the string should look like the following.
#defoptions=quiet splash vga=791
4. Update GRUB.
$ sudo update-grub
5. If Usplash is configured for a higher resolution than your framebuffer, it will appear off-centered. So adjust /etc/usplash.conf to use the same resolution.
xres=1024
yres=768
6. Update initramfs to rebuild the initrd image.
$ sudo update-initramfs -u
After rebooting, your usplash will appear as normal and you can Ctrl+Alt+F1 to a console after your X environment has finished loading. The text in your console should now appear much smaller and will be much easier to use for large amounts of console work.
Posted by admin on June 24, 2007 under Tech Tips |
WARNING! THIS POST HAS BEEN MARKED AS OUTDATED!
While there may be useful information still contained within the article, there may be other more relevant articles out on the Internet. Please pay close attention to version numbers of software that this article refers to. If you’re not careful, you could break your system if you do not understand what you are doing. If you would like to see this article updated, please contact the site administrator using the Contact page. Thanks!
Updated (11/21/2007): I’ve added an updated version of this How-to on the community supported Ubuntu documentation site. The new document can be found at: https://help.ubuntu.com/community/SinglePacketAuthorization.
Single Packet Authorization (SPA) using “fwknop” is probably one of the coolest recent innovations in server and network access control technology. Just what is SPA, you ask? SPA is a method of limiting access to server and network resources by cryptographically authenticating users before any type TCP/IP stack access is allowed.
In it’s simplest form, your Linux server can have an inbound firewall rule that by default drops all access to any of it’s listening services. Nmap scans will completely fail to detect any open ports, and zero-day attacks will not have any effect on vulnerable services since the firewall is blocking access to the applications.
The server however has a nifty trick up it’s sleeve. An authorized user sends a single encrypted UDP packet that is passively sniffed and analyzed by the fwknopd service running on the server using pcap. If successfully authenticated, fwknopd dynamically creates an iptables firewall rule, granting the source IP address of the authorized client access to the service for a defined period of time (default is 30 seconds). Pretty frickin’ cool, eh?
Okay, so here’s how to get it working in Ubuntu 7.04. Read more of this article »


