Posted by admin on December 9, 2009 under Tech Tips | 
If you’re running the Gnome desktop environment and would like to have GnuPG context menu options in Nautilus to encrypt, decrypt, and digitally sign files, simply install the Seahorse plugins package available in your favorite Linux distribution repositories. If using Debian or Ubuntu, it’s as easy as an apt-get install.
sudo apt-get install seahorse-plugins
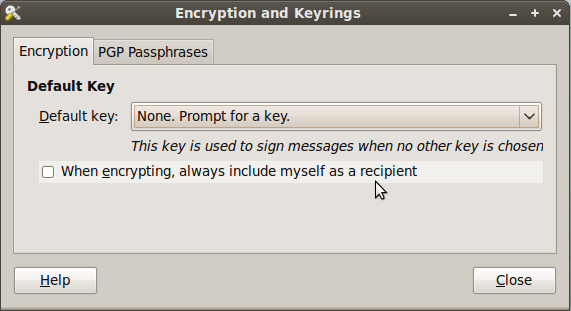
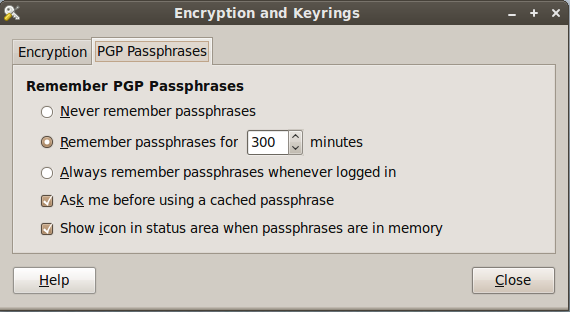
After installing the package, go to System -> Preferences -> Encryption and Keyrings, select a default key to use and decide whether you want to include your own key by default when encrypting files. This is sometimes a good idea if you ever want to open a file you encrypted to someone else. Below are some screenshots of the Seahorse preferences.
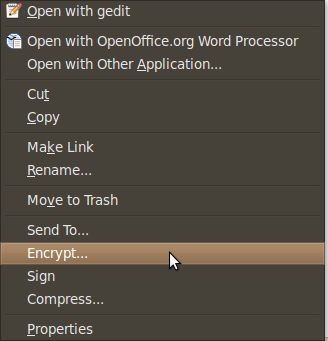
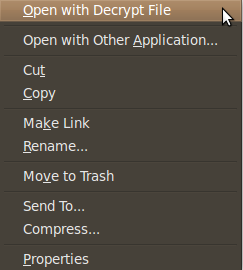
Here are some screen shots of the context menu options that appear when you right click on files in Nautilus.
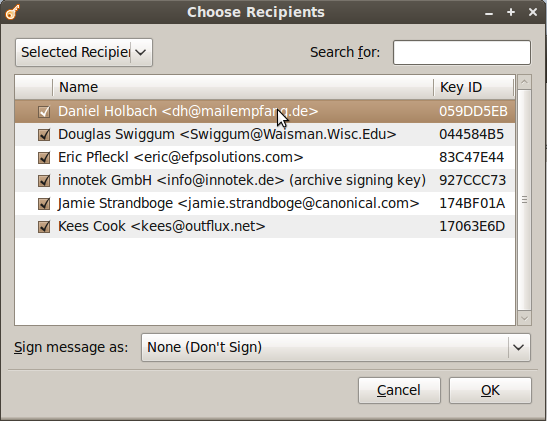
When you choose to encrypt a file, you can select as many public keys as you’d like. Here’s an example of the dialogue.
Using PGP has never been easier. There are still some improvements to the UI I would like to see completed, but overall the most important features are there.
Posted by admin on November 4, 2009 under Tech Tips |
If you ever want to quickly protect a file by encrypting it with a simple password, you can use GnuPG and symmetric key encryption for the job. Using this method, you can use industry strength encryption like AES256 and not have to worry about public and private keys. Just remember your password and use PGP compatible software to decrypt the files when needed.
For example, this is how you can encrypt a zip file called backup.zip and output the result to a new file called backup.zip.gpg.
gpg --symmetric --cipher-algo aes256 -o backup.zip.gpg backup.zip

Enter passphrase: *******

Repeat passphrase: *******
To decrypt the file, the following will work.
gpg -d -o backup.zip backup.zip.gpg

gpg: AES256 encrypted data

Enter passphrase: *******

gpg: encrypted with 1 passphrase
For fun, here’s how to create a Gzip Tar archive (tar.gz) and encrypt it on the fly.
tar czvpf - SomeFiles/ | gpg --symmetric --cipher-algo aes256 -o backup.tar.gz.gpg

Enter passphrase: *******

Repeat passphrase: *******
To decrypt and extract in a single command, the following also works.
gpg -d backup.tar.gz.gpg | tar xzvf -

gpg: AES256 encrypted data

Enter passphrase: *******

gpg: encrypted with 1 passphrase
If you’re curious to know what other ciphers are available to you, simple use the gpg --versioncommand.
gpg --version | grep Cipher

Cipher: 3DES, CAST5, BLOWFISH, AES, AES192, AES256, TWOFISH
Posted by admin on October 8, 2007 under Tech Tips |
Performing GnuPG functions from Vim is actually pretty helpful if you work heavily with both applications on a regular basis. I was recently looking for a simple way to both word wrap and clearsign various text files within Vim, and found just what I was looking for.
1. (optional) Set the word wrap of text in Vim to a maximum text width of 70 characters. This can be done manually, or by simply adding the following text to your “~/.vimrc” file:
:set textwidth=70
2. As for the ability to clearsign, encrypt, decrypt and verify the text from within Vim, you can create command mode aliases as shortcuts for longer commands in Vim. Simply add the following to your “~/.vimrc” file:
:cmap cs %!gpg --clearsign

:cmap es %!gpg -seat

:cmap ee %!gpg -eat

:cmap de %!gpg -d
Once you save the changes to your .vimrc file, open any text file with vim, enter command mode, and type any of the shortcuts mentioned in step two; “cs” to clearsign, “es” to encrypt and sign, “ee” to encrypt with no signature, and “de” to decrypt or verify. The shortcut will display the command about to be issued, to which you can hit can enter to execute it. You will be prompted for recipients, and/or the private key passphrase depending on the function you choose.
If you are familiar with GnuPG syntax, you can change or add any of the above commands to your liking. For instance, for those of you with multiple PGP keys, you can add the “-u”option to specify which one you would like to use.
To wrap an existing unwrapped text file, simply higlight the entire message by placing the Vim cursor at the top of the file, press <shift>+V, followed by <shift>+G. This highlights all text as you will notice. While everything is highlighted, simply press “gq”. This will wrap everything according to your “textwidth” variable.
Feel free to test it out, and provide as much feedback as you like. Have fun.
Special Note:
When using the “textwidth” variable, you may find that it is useful to toggle the paste function. If you are pasting text that has a larger text width than that of which you have specified in Vim (in this case 70 characters), then your paste will automatically be word wrapped to 70.
You may not want this behavior, so the two opposing options you can set manually are:
:set paste

:set nopaste
Better yet, you can map a quick function key to toggle it on or off by adding the following to your .vimrc file:
:set pastetoggle=<F10>
To test, while in insert mode of Vim, press the F10 key, and you will notice that the mode will be clearly identified with:
"-- INSERT (paste) --"
This will allow you to paste text in it’s unwrapped form.
