Posted by admin on February 21, 2013 under Tech Tips | 
If you have a source video file encoded with an AC3 Dolby Digital audio stream, you can extract the audio in it’s native format using FFMpeg.
The following example shows how to identify the available audio streams of the file video.avi. Just use ffmpeg without any output options, and you can see there are two streams (0.0 and 0.1), the second is AC3 audio.
ffmpeg -i video.avi

Input #0, avi, from 'video.avi':

Duration: 01:17:57.64, start: 0.000000, bitrate: 1587 kb/s

Stream #0.0: Video: mpeg4, yuv420p, 672x576 (snipped for brevity)

Stream #0.1: Audio: ac3, 48000 Hz, 5.1, s16, 448 kb/s

At least one output file must be specified
The following command will extract the AC3 audio stream to a file called audio.ac3.
ffmpeg -i video.avi -acodec copy audio.ac3

Input #0, avi, from 'video.avi':

Duration: 01:17:57.64, start: 0.000000, bitrate: 1587 kb/s

Stream #0.0: Video: mpeg4, yuv420p, 672x576 (snipped for brevity)

Stream #0.1: Audio: ac3, 48000 Hz, 5.1, s16, 448 kb/s

Output #0, ac3, to 'audio.ac3':

Stream #0.0: Audio: ac3, 48000 Hz, 5.1, s16, 448 kb/s

Stream mapping:

Stream #0.1 -> #0.0

Press [q] to stop encoding

size= 255799kB time=4677.51 bitrate= 448.0kbits/s

video:0kB audio:255799kB global headers:0kB muxing overhead 0.000000%
Verify the file was created. The output below shows that this stream is about 250Mb.
ls -lh audio.ac3

-rw-r--r-- 1 username gmendoza 250M 2010-02-21 09:47 audio.ac3
You can now use ffmpeg again to show that audio.ac3 only contains the ac3 audio stream.
ffmpeg -i audio.ac3

Input #0, ac3, from 'audio.ac3':

Duration: 01:17:57.46, bitrate: 448 kb/s

Stream #0.0: Audio: ac3, 48000 Hz, 5.1, s16, 448 kb/s

At least one output file must be specified
Now that you have extracted the audio stream, you can do anything you wish with it. Enjoy.
Posted by admin on September 19, 2012 under Tech Tips |
If you would like to copy a DVD to an XviD video file using Linux, doing so from the command line offers a number of flexibility benefits over many graphical tools. Two fantastic tools for the job are lsdvd and mencoder. I like lsdvd because it provides a great deal of information in an easy to read format, and mencoder is just a phenomenal tool for multimedia encoding.
There are some pre-requisite applications you need in order to follow along. Be sure to install mplayer, mencoder, lsdvd, lame, and if your DVD’s are encrypted, the libdvdcss2 libraries. If using Ubuntu, Debian, etc, then all are available in the repositories, except libdvdcss2 which is available in the Medibuntu repositories.
Quick XviD Encoding Examples (For the Impatient)
In the following examples, we’ll use mencoder with the most basic of options, allowing mencoder to decide which video and audio streams to use. Mencoder’s choice may not be what you want, and the audio will also be converted to a high quality VBR stereo MP3. Adjust any settings as you see fit.
Single-Pass Encoding
Fixed Quantizer Value of 4 (Good quality, decent file size)
mencoder dvd:// -oac mp3lame -lameopts q=0:aq=0

-ovc xvid -xvidencopts fixed_quant=4:autoaspect -o video.avi
Fixed Quantizer Value of 2 (High quality, larger file size)
mencoder dvd:// -oac mp3lame -lameopts q=0:aq=0

-ovc xvid -xvidencopts fixed_quant=2:autoaspect -o video.avi
Two Pass Encoding
Pass 1: (no need for audio or quality settings such as bitrate)
mencoder dvd:// -nosound -passlogfile pass1.log

-ovc xvid -xvidencopts pass=1:turbo:autoaspect -o /dev/null
Pass 2 Option 1: (VBR ~ 1500 kbps)
mencoder dvd:// -oac mp3lame -lameopts q=0:aq=0 -passlogfile pass1.log

-ovc xvid -xvidencopts pass=2:autoaspect:bitrate=1500 -o video.avi
Pass 2 Option 2: (VBR ~ Restrict final video size to 1.5 Gb)
mencoder dvd:// -oac mp3lame -lameopts q=0:aq=0 -passlogfile pass1.log

-ovc xvid -xvidencopts pass=2:autoaspect:bitrate=-1500000 -o video.avi
Basic Source Selection Examples
If you are copying a DVD directly from a physical disc as the examples throughout this post will assume, the following two examples will work. The first automatically selects title 1, and the second specifies title 2.
mencoder dvd:// (other options)

mencoder dvd://2 (other options)
If you’re encoding a DVD from an ISO or similar image file, or have the contents of a DVD extracted to directory, use the -dvd-device option as shown below.
mencoder dvd:// -dvd-device video.iso (other options)

mencoder dvd:// -dvd-device /path/to/dvd_directory/ (other options)
Basic Audio Examples
To encode the selected audio stream to a high quality VBR stereo MP3 format.
mencoder dvd:// -oac mp3lame -lameopts q=0:aq=0 (other options)
If the source audio stream is encoded as AC3 or DTS 5.1 (6 Channels), you can simply copy the stream, but remember to specify 6 channels. The default is 2.
mencoder dvd:// -oac copy -channels 6 (other options)
To exclude all sound, which is useful for the first pass of a two-pass job, or if you prefer to multiplex the audio later, use the -nosound option.
mencoder dvd:// -nosound (other options)
Gathering Source Video Information for Informed Encoding Decisions
First you should identify which DVD title tracks are available, so you can determine which one you want to copy. Most DVDs will place the movie as the first track, but you may not always be that lucky. You can use lsdvd to list the number of titles, chapters, and audio tracks on your DVD.
lsdvd /dev/dvd

Disc Title: DVD_TITLE

Title: 01, Length: 01:26:08.200 Chapters: 13, Cells: 13, Audio streams: 02, Subpictures: 01

Title: 02, Length: 00:02:01.120 Chapters: 01, Cells: 01, Audio streams: 02, Subpictures: 01

Title: 03, Length: 00:02:26.120 Chapters: 01, Cells: 01, Audio streams: 02, Subpictures: 01

Longest track: 01
In the example above, we found that Title 01 is the longest at 1 hour 26 minutes, has 13 chapters and 2 audio streams.
Use lsdvd again to gather additional information about video properties of this specific title.
lsdvd -v -t 1 /dev/dvd

Disc Title: DVD_TITLE

Title: 01, Length: 01:26:08.200 Chapters: 13, Cells: 13, Audio streams: 02, Subpictures: 01

VTS: 01, TTN: 01, FPS: 25.00, Format: PAL, Aspect ratio: 4/3, Width: 720, Height: 576, DF: ?
From the output above, we see that this video is in the PAL format at 25.00 frames per second and an aspect ratio of 4/3. Use mplayer to play this title and verify it’s the one you want.
mplayer dvd://1
Gathering Source Audio Information
Use lsdvd to give you more detail on the available audio streams for the title you’re working on.
lsdvd -a -t 1 /dev/dvd

Disc Title: DVD_TITLE

Title: 01, Length: 01:26:08.200 Chapters: 13, Cells: 13, Audio streams: 02, Subpictures: 01

Audio: 1, Language: nl - Nederlands, Format: ac3, Frequency: 48000, Quantization: drc, Channels: 2, AP: 0, Content: Undefined, Stream id: 0x80

Audio: 2, Language: en - English, Format: ac3, Frequency: 48000, Quantization: drc, Channels: 2, AP: 0, Content: Undefined, Stream id: 0x81
The output above shows that there are two audio streams, both AC3 Dolby Digital, however only the second one is in English. Mencoder and mplayer allow you to specify your desired audio stream by language as shown in the following example.
mencoder dvd://1 -alang eng (other options)
If your source has multiple English streams, you can specify which particular audio ID (aid) you want. Mplayer can be used to display all available audio identifiers of a DVD. The following command is a little long but it should serve you well.
mplayer dvd://1 -identify -frames 0 -vo null 2>&1 | grep aid

audio stream: 0 format: ac3 (stereo) language: nl aid: 128.

audio stream: 1 format: ac3 (stereo) language: en aid: 129.
From the output above, the English AC3 audio stream we want is identified by aid 129. It can be specified when using mplayer and mencoder as shown below.
mencoder dvd://1 -aid 129 (other options)
Advanced Single-Pass XviD Encoding
As mentioned before, you can encode your video using a single-pass fixed quantizer mode. It may not be as efficient in size and quality as opposed to a two-pass method, but it can save some time and complexity. Here’s the more advanced encoding options I tend to use for virtually all of my XviD encoding jobs, coupled with the information we gathered from above. A fixed_quant value between 2 and 4 work very well. The lower the number the higher the quality and larger the resulting file size.
mencoder dvd://1 -alang eng -oac mp3lame -lameopts q=0:aq=0

-ovc xvid -xvidencopts fixed_quant=4:autoaspect:max_key_interval=25:

vhq=2:bvhq=1:trellis:hq_ac:chroma_me:chroma_opt:quant_type=mpeg

-o video.avi
I added a number of quality settings as discussed both in the mencoder man page and this useful link here.
One option that seems to lack a lot of documentation is the max_key_interval setting. It influences the seekability of the encoded video. By default, the max_key_interval is set to a value of 250, which adds an I-frame at a maximum interval of 250 frames. This equates to approximately every 10 seconds depending on the frame rate of your source video. I like to set the value to 25 which is pretty low and results in a slightly larger file, but provides a seek accuracy of about 1 second. That’s just my preference, so feel free to change it as you wish.
Advanced Two-Pass XviD Encoding
Using the same advanced XviD encoding options as above, here’s what a two pass encoding job would look like.
mencoder dvd:// -nosound -passlogfile pass1.log

-ovc xvid -xvidencopts pass=1:turbo:autoaspect:vhq=0:max_key_interval=25

-o /dev/null
mencoder dvd:// -oac mp3lame -lameopts q=0:aq=0 -passlogfile pass1.log

-ovc xvid -xvidencopts pass=2:autoaspect:max_key_interval=25:bitrate=1500:

vhq=2:bvhq=1:trellis:hq_ac:chroma_me:chroma_opt:quant_type=mpeg -o video.avi
Cropping Black Borders
If your video source has black borders, you can crop them out to reduce the overall size of your video. For example, you video may resemble the following diagram.

Video with black borders
These borders can be cropped with a video filter -vf crop=w:h:x:y where w, h, x and y are the width, height, x and y coordinates. To help determine which crop values are appropriate, first play your video with mplayer using the -vf cropdetect option, and seek through the movie to bright points of the movie where the black borders are clearly visible. Dark opening scenes may give you inaccurate edge readings.
mencoder dvd:// -vf cropdetect

(snipped for brevity)

[CROP] Crop area: X: 6..711 Y: 0..575 (-vf crop=704:576:8:0).0 0

[CROP] Crop area: X: 6..711 Y: 0..575 (-vf crop=704:576:8:0).0 0

[CROP] Crop area: X: 6..711 Y: 0..575 (-vf crop=704:576:8:0).0 0

[CROP] Crop area: X: 6..711 Y: 0..575 (-vf crop=704:576:8:0).0 0

[CROP] Crop area: X: 6..711 Y: 0..575 (-vf crop=704:576:8:0).0 0
Copy the values that mplayer displays in the background terminal as the example above shows and use them like the following.
mencoder dvd:// -vf crop=704:576:8:0 (other options)
Conclusion
I hope this post provides you with detail that helps you with your DVD encoding endeavors. Please feel free to post your comments, questions and tips. If needed, I’ll adjust the post to include your valuable input!
Posted by admin on February 13, 2010 under Tech Tips |
3gp is the container format used when recording video with many mobile phones, which can be a pain when trying to view them using a number of multimedia players. Fortunately, converting videos from 3gp to XviD AVI is easy with FFmpeg.
Usually, there’s not much to the quality of these types of source video files, so many of the more complex video and audio options aren’t needed. A simple FFmpeg command that retains as much quality as possible would look like the following.
ffmpeg -i video.3gp -acodec libmp3lame -vcodec libxvid -qscale 2 -f avi video.avi
Posted by admin on December 15, 2009 under Tech Tips |
Previously, I described how to Extract Audio from Video Files to WAV using Mplayer. Another method using FFmpeg instead of Mplayer was also pointed out in the post titled Add Stereo Audio Tracks to MKV Files, and I figured it would be useful to outline the quick one-step process in a post all by itself.
Here’s an example of extracting the audio from a video file called video.mkv and saving it to a file called audio.wav. This very well could have been an AVI, MPEG, or any other video format that FFmpeg can decode.
ffmpeg -i video.mkv -acodec pcm_s16le -ac 2 audio.wav
It should also be mentioned that your source video file may have multiple audio channels or streams. For example, you may have both English AC3 and DTS channels, but you may also have other audio streams for other languages, directors comments, etc. If you want more control over which stream you are using, first identify them all with ffmpeg.
ffmpeg -i video.mkv

[snipped for brevity]

Input #0, matroska, from 'video.mkv':

Duration: 01:30:38.78, start: 0.000000, bitrate: N/A

Stream #0.0(eng): Video: h264, yuv420p, 1280x720, PAR 1:1 DAR 16:9, 23.98 tbr, 1k tbn, 47.95 tbc

Stream #0.1(eng): Audio: ac3, 48000 Hz, 5.1, s16

Stream #0.2(eng): Subtitle: 0x0000

Stream #0.3(heb): Audio: mp3, 48000 Hz, stereo, s16

Stream #0.4(heb): Subtitle: 0x0000

Stream #0.5: Attachment: 0x0000

Stream #0.6: Attachment: 0x0000

At least one output file must be specified
From the example above, you see that Stream #0.0 is labeled as being an English video stream with h264 encoding. Stream #0.1 and #0.3 are both audio streams, but #0.1 is English AC3 5.1 and #0.3 is Hebrew MP3 stereo. Simply reference the stream id with the -map option in the following format.
ffmpeg -i video.mkv -map 0:1 -acodec pcm_s16le -ac 2 audio.wav

[snipped for brevity]

Output #0, wav, to 'audio.wav':

Stream #0.0(eng): Audio: pcm_s16le, 48000 Hz, stereo, s16, 1536 kb/s

Stream mapping:

Stream #0.1 -> #0.0

[snipped for brevity]
Now that you have a PCM WAV file, you can manipulated it however you like, e.g. encode to MP3, OGG, FLAC, etc.
lame -V0 -q0 --vbr-new audio.wav audio.mp3

oggenc -q6 audio.wav

flac audio.wav
Posted by admin on December 13, 2009 under Tech Tips |
The following outlines the process of dynamically adding a blockquote message at the top of any post you have flagged as being “outdated”. Over time, your posts can become outdated or even completely inaccurate, especially if you’re running a tech blog, since software constantly changes. This will help warn readers that there may be issues with the post in it’s current condition.
I did some digging around and couldn’t find an official plugin that took care of this. I did however stumble across a blog post by Trey Piepmeier that helped me understand a fairly straight forward method of doing it yourself. I typically don’t like to rehash work someone has already discussed, but I figured it would help to give a little more detail for those interested. Depending on your PHP and WordPress theme modification skills, you can change this however you like.
PLEASE MAKE A BACKUP OF YOUR THEME BEFORE CHANGING ANYTHING.
You can place the following PHP “if” condition just BELOW the code referencing your post title and ABOVE the code referencing your post content. The get_post_meta() function assigns the $status variable with the value of a custom field you will later define as “outdated”. If it matches, then a blockquote message will be printed, otherwise it will be skipped and the post will continue as normal.
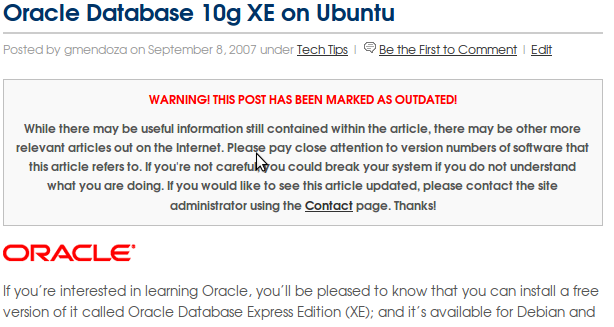
WARNING! THIS POST HAS BEEN MARKED AS OUTDATED!
Enter some useful message here about the article being old.
Depending on your theme, this can typically be done in your themes index.php and single.phpfiles, but you should also update any other you use to publish posts from.
Then, all you need to do is edit any of your outdated posts and add a custom field with the name of “status” and a value of “outdated” without any quotes and your work is complete.
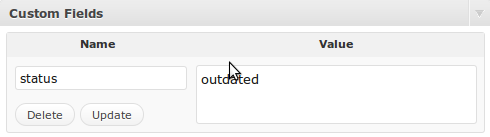
An example of what this might look like on your blog is shown below.
Please feel free to leave comments, suggestions or concerns. A great deal of help on figuring this out was also provided in the #Wordpress IRC channel on irc.freenode.net. If you find yourself in a pickle, there’s always someone there willing to help you out.
Posted by admin on December 9, 2009 under Tech Tips |
If you’re running the Gnome desktop environment and would like to have GnuPG context menu options in Nautilus to encrypt, decrypt, and digitally sign files, simply install the Seahorse plugins package available in your favorite Linux distribution repositories. If using Debian or Ubuntu, it’s as easy as an apt-get install.
sudo apt-get install seahorse-plugins
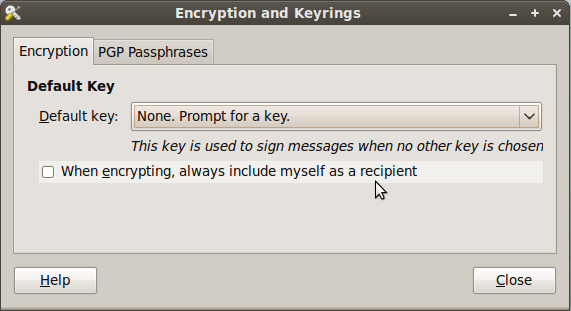
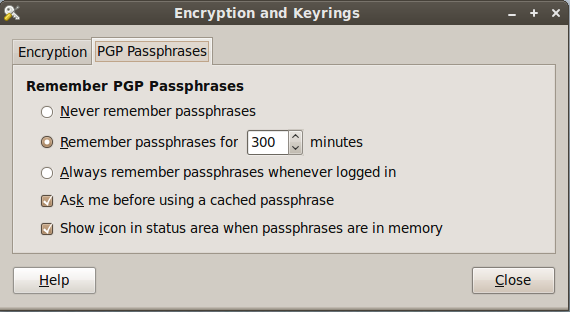
After installing the package, go to System -> Preferences -> Encryption and Keyrings, select a default key to use and decide whether you want to include your own key by default when encrypting files. This is sometimes a good idea if you ever want to open a file you encrypted to someone else. Below are some screenshots of the Seahorse preferences.
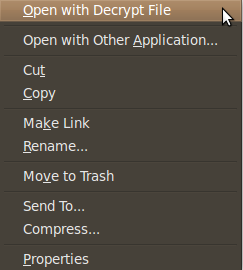
Here are some screen shots of the context menu options that appear when you right click on files in Nautilus.
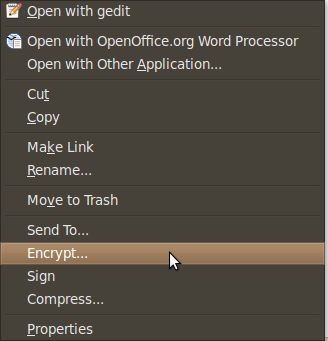
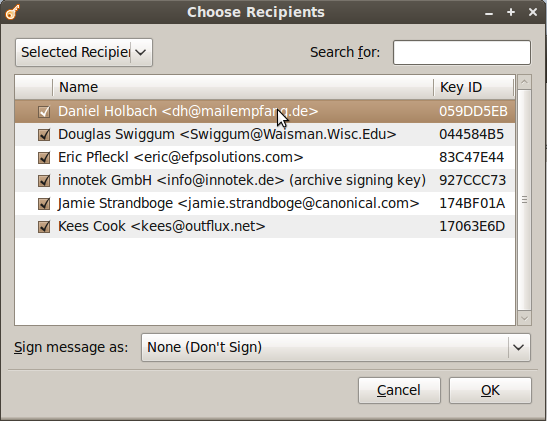
When you choose to encrypt a file, you can select as many public keys as you’d like. Here’s an example of the dialogue.
Using PGP has never been easier. There are still some improvements to the UI I would like to see completed, but overall the most important features are there.
Posted by admin on December 1, 2009 under Tech Tips |
When adding third party software repositories to your APT sources list, you can easily download a referenced PGP key to your APT keyring using the advanced options of the apt-key utility.
For example, if you are adding a third party repository that references the PGP key ID of 6E80C6B7, the following will work as long as the key has been uploaded to a keyserver.
sudo apt-key adv --keyserver keyserver.ubuntu.com --recv-keys 6E80C6B7

gpg: requesting key 6E80C6B7 from hkp server keyserver.ubuntu.com

gpg: key 6E80C6B7: public key "Launchpad PPA for Banshee Team" imported

gpg: no ultimately trusted keys found

gpg: Total number processed: 1

gpg: imported: 1 (RSA: 1)
Typically, instructions on adding repositories give readers a two or three step process that involves apt-key reading a key from a text file or piped from a wget command. The above just cuts all that nonsense out.
The apt-key man page is a bit bare, but there are a few other options you might find interesting that are only mentioned in the commands help output.
apt-key

Usage: apt-key [command] [arguments]
Manage apt's list of trusted keys
apt-key add - add the key contained in ('-' for stdin)

apt-key del - remove the key

apt-key export - output the key

apt-key exportall - output all trusted keys

apt-key update - update keys using the keyring package

apt-key net-update - update keys using the network

apt-key list - list keys

apt-key finger - list fingerprints

apt-key adv - pass advanced options to gpg (download key)
Posted by admin on November 11, 2009 under Tech Tips |
If you have a video vile that you wish to convert and burn to DVD, you can do so from a Linux command line very easily. We will use FFmpeg for the video conversion, DVDAuthor to create the DVD file system structure, and Growisofs to burn the DVD.
Using FFmpeg, simply specify your input file, the target format, resolution and an output file name. While the following is an over simplified example, it will more than likely work very nicely in most scenarios. The source video file is movie.avi, the target will be formatted for NTSC, and a standard DVD resolution of 720×480 will be used to create a new video file called movie.mpg. There are many additional options that FFMpeg can use to increase quality, so be sure to check out the documentation.
ffmpeg -i movie.avi -target ntsc-video -s 720x480 movie.mpg
Next, you will need to take your new movie.mpg file, and create a DVD file structure that you will burn to disc. Just create a folder that will serve as the parent directory of your DVD. I Like to name it after the title of the movie. Then you will use dvdauthor to create a title set and table of contents and no DVD menus. The movie will just play. 
mkdir MOVIE_TITLE

dvdauthor -o MOVIE_TITLE/ -t movie.mpg

dvdauthor -o MOVIE_TITLE/ -T
The dvdauthor -t option creates a title track in the VIDEO_TS directory. If you list the contents after running the first command, you’ll see the corresponding VTS_01_0.BUP, VTS_01_0.IFO, and VTS_01_X.VOB files. The -T option creates a table of contents for all title sets in the file system, which are listed as VIDEO_TS.BUP and VIDEO_TS.IFO.
You are now ready to burn the DVD. In the following command, we will use the -Z option to burn an initial session to the disc, the -dvd-video option to generate a DVD-Video compliant UDF file system, and the -V option to give the disc a Volume ID. This Volume ID is read by your computer to and displays as a nice human readable title typically underneath the icon representing the disc. The -dvd-video and -V options are actually part of the mkisofs (genisoimage) command sets, so they do not show up in the growisofs man pages.
growisofs -Z /dev/dvdrw -dvd-video -V MOVIE_TITLE MOVIE_TITLE/
Notice, you do not need to generate an ISO file to burn the DVD. This would only waste space if your intention is not to distribute or store the video as a disc image. To create the image however, that’s as easy as the following.
genisoimage -o MOVIE_TITLE.iso -dvd-video MOVIE_TITLE/
Posted by admin on November 4, 2009 under Tech Tips |
If you ever want to quickly protect a file by encrypting it with a simple password, you can use GnuPG and symmetric key encryption for the job. Using this method, you can use industry strength encryption like AES256 and not have to worry about public and private keys. Just remember your password and use PGP compatible software to decrypt the files when needed.
For example, this is how you can encrypt a zip file called backup.zip and output the result to a new file called backup.zip.gpg.
gpg --symmetric --cipher-algo aes256 -o backup.zip.gpg backup.zip

Enter passphrase: *******

Repeat passphrase: *******
To decrypt the file, the following will work.
gpg -d -o backup.zip backup.zip.gpg

gpg: AES256 encrypted data

Enter passphrase: *******

gpg: encrypted with 1 passphrase
For fun, here’s how to create a Gzip Tar archive (tar.gz) and encrypt it on the fly.
tar czvpf - SomeFiles/ | gpg --symmetric --cipher-algo aes256 -o backup.tar.gz.gpg

Enter passphrase: *******

Repeat passphrase: *******
To decrypt and extract in a single command, the following also works.
gpg -d backup.tar.gz.gpg | tar xzvf -

gpg: AES256 encrypted data

Enter passphrase: *******

gpg: encrypted with 1 passphrase
If you’re curious to know what other ciphers are available to you, simple use the gpg --versioncommand.
gpg --version | grep Cipher

Cipher: 3DES, CAST5, BLOWFISH, AES, AES192, AES256, TWOFISH
Posted by admin on November 3, 2009 under Tech Tips |
If you want to gain quick insight into the basic properties of a video file from the Linux command line, there’s a few really easy methods. The information you might be interested in are audio and video codecs, resolution, frame rates, bitrates, etc.
Using mplayer, you can see some basic information about a video file. For example, the following video is using the WMV3 video codec at the resolution of 1280×720 (720p), the bitrate of 3000 kbps, etc.
mplayer video.wmv -vo null -ao null -frames 0 2>&1 /dev/null | egrep "(VIDEO|AUDIO)"

VIDEO: [WMV3] 1280x720 24bpp 1000.000 fps 3000.0 kbps (366.2 kbyte/s)

AUDIO: 44100 Hz, 2 ch, s16le, 96.0 kbit/6.80% (ratio: 12003->176400)
The audio rate is shown to be 44100 Hz using 2-Channel stereo, but the codec is not listed. You can get additional information with the -identify option.
mplayer video.wmv -identify -vo null -ao null -frames 0 2>&1 /dev/null | egrep "(^ID|VIDEO|AUDIO)"

ID_AUDIO_ID=1

ID_VIDEO_ID=2

VIDEO: [WMV3] 1280x720 24bpp 1000.000 fps 3000.0 kbps (366.2 kbyte/s)

ID_CLIP_INFO_NAME0=name

ID_CLIP_INFO_VALUE0=

ID_CLIP_INFO_NAME1=author

ID_CLIP_INFO_VALUE1=

ID_CLIP_INFO_NAME2=copyright

ID_CLIP_INFO_VALUE2=

ID_CLIP_INFO_NAME3=comments

ID_CLIP_INFO_VALUE3=

ID_CLIP_INFO_N=4

ID_FILENAME=video.wmv

ID_DEMUXER=asf

ID_VIDEO_FORMAT=WMV3

ID_VIDEO_BITRATE=3000000

ID_VIDEO_WIDTH=1280

ID_VIDEO_HEIGHT=720

ID_VIDEO_FPS=1000.000

ID_VIDEO_ASPECT=1.7778

ID_AUDIO_FORMAT=353

ID_AUDIO_BITRATE=0

ID_AUDIO_RATE=0

ID_AUDIO_NCH=0

ID_LENGTH=2116.00

ID_VIDEO_ASPECT=1.7778

ID_VIDEO_CODEC=wmv9dmo

AUDIO: 44100 Hz, 2 ch, s16le, 96.0 kbit/6.80% (ratio: 12003->176400)

ID_AUDIO_BITRATE=96024

ID_AUDIO_RATE=44100

ID_AUDIO_NCH=2

ID_AUDIO_CODEC=ffwmav2
Another great tool for identifying video attributes is idvid. idvid comes with the tovid package, so be sure to install it from your repository. It is a bit slow, but the output is very clean and easy to interpret.
idvid video.wmv

--------------------------------

idvid

Video identification script

Part of the tovid suite, version 0.31

http://www.tovid.org

--------------------------------

Analyzing file: 'video.wmv'. This may take several minutes...

=========================================================

File: video.wmv

Width: 1280 pixels

Height: 720 pixels

Aspect ratio: 1.77:1

Frames: 63352

Duration: 00:35:13 hours/mins/secs

Framerate: 1000.000 frames per second

Video format: WMV3

Video bitrate: 3000000 bits per second

---------------------------

Audio track 1 (Stream 0.0, AID 0):

---------------------------

Codec: wmav2

Bitrate: 0000 bits per second

Sampling rate: 44100 Hz

=========================================================

Audio is compliant with the following formats:

Not compliant with (S)VCD or DVD

Video is compliant with the following formats:

Not compliant with (S)VCD or DVD

This video does not seem to be compliant with (S)VCD or DVD

standards. If you burn it to a video disc, it may not work.

=========================================================
Finally, another tool that works very well is exiftool. It’s available in the libimage-exiftool-perl package. The output is also very straight forward, and easy to interpret. It’s also a lot faster than idvid because the tool only displays metadata, which in some cases can be misleading.Mplayer and tovid actually probe the video, providing very accurate information at the cost of speed.
exiftool video.wmv

ExifTool Version Number : 7.30

File Name : video.wmv

Directory : .

File Modification Date/Time : 2009:04:20 09:21:58

File Type : WMV

MIME Type : video/x-ms-wmv

File ID : 12341234-1234-1234-1234-123412341234

File Size : 823200182

Creation Date : 2009:03:31 02:52:55Z

Data Packets : 102833

Play Duration : 35:16

Send Duration : 35:13

Preroll : 3000

Flags : 2

Min Packet Size : 8000

Max Packet Size : 8000

Max Bitrate : 3122812

Is VBR : False

Audio Codec Name : Windows Media Audio 9.2

Audio Codec Description : 96 kbps, 44 kHz, stereo 1-pass CBR

Video Codec Name : Windows Media Video 9

Video Codec Description : Professional

Audio Codec ID : Windows Media Audio V2 V7 V8 V9 / DivX audio (WMA) / Alex AC3 Audio

Audio Channels : 2

Audio Sample Rate : 44100

Stream Type : Video

Error Correction Type : No Error Correction

Time Offset : 0 s

Stream Number : 2

Image Width : 1280

Image Height : 720

Title :

Author :

Copyright :

Description :

Rating :

Image Size : 1280x720
As always, comments and additional tips are welcome!
